Remodeling can be expensive, but custom cabinetry doesn’t have to be. By using pocket change and your creative side, you can create unique and functional cabinetry (and furniture!) for your home that exudes the high-end vibe without the high-end price tag.
Champagne Wishes with a Beer Budget
If you’re like me, you unconsciously gravitate to the finer things in life. I don’t mean to… that’s just where my taste and style lies, much to my mother’s chagrin… but that’s a story for my therapist. Because my budget has never aligned with my taste, I learned to use my creative side and think outside of the box to still get that high-end look without the price tag that usually accompanies it. That applies to all aspects of my life including my home. Who doesn’t love a bargain?
I recently married and moved into my husband’s home. He has lived here his entire life, and the house reflected the fact that a man lived there. It’s a beautiful, large antique Cape home with great potential and bones but it’s seriously lacking at every turn at the moment. The dining room contained a couch and a large TV for football viewing. Apparently there has to be a TV in every room for football viewing, ManRule #1201, And every room in the home is pained a gawd awful shade called “Jackson Brown” from 1990 *A shade chosen by my husband because “That was my dogs name back then.” I just can’t…. :/
So, needless to say I have busied my stay-at-home self, creating a beautiful home one room at a time. I remedied the dining room creating a beautifully curated space reflecting my love of antiques and French country style using thrifted and repurposed finds. I also handcrafted and installed faux beams for the dining room ceiling, and they came out AH-mazing. My dining room is open to my kitchen and separated only by a large, framed out opening. The kitchen is very dated. It’s still in the 60’s with its 6 layers of horrible, lifting-in-spots flooring. Plain, yellowed pine cabinets line the bottom of one side in the kitchen and there is barely enough counter space to make a sandwich if you did the dishes. There was an island that was attached to the kitchen wall but now resides in the center of the room, which leaves an opening to the sub flooring where it used to be. The island has gone through a couple minor transformations in the last 3 years starting with transforming the dated Formica top into a faux antique wood top using a budget friendly kit and painting the base a beautiful shade from the Magnolia paint line. Fast forward a year or so and it underwent a minor makeover consisting of another paint change and new chairs. I even gave the hardware an updated look with a little Rub n Buff. I think it’s good for now. The rest of the kitchen, well that’s a different story.
I have made a few changes throughout the last couple years getting rid of the Jackson Brown kitchen color and purchasing a high-end stove originally valued at $5,000.00 for $400.00 off Facebook Marketplace. An absolute score if I do say so myself. This led to the start of the kitchen remodel. I love to cook, and I spend a great deal of my time in the kitchen. It’s the heart of my home and needs to be beautiful and functional. It’s also the first room you see when you enter my home and sets the vibe for my style aesthetic so when it was time for the cabinetry, I decided to have it priced out. Afterall, there would only be 6 lower cabinets, 8 draws, a freestanding custom pantry unit and new counters. I wanted a farmhouse sink with a white porcelain finish. Nothing too fancy, and a faux finish on the cabinets to really lend to the French country vibe. The quote came back at $14,500.00 and I almost passed out. There was no way my husband was going to spend this kind of money whether we had it or not. Most people would have had their dreams stomped out at the sight of that quote, but not me. The creative side of me flourishes in situations like this. My breathing deepens. My heart rate picks up a bit and I get butterflies in my stomach. I love a challenge almost as much as I love exceeding that challenge and by thinking outside the box, I’m going to get my kitchen without compromising on my wants and needs regardless of my budget.
Where to Start…
The first steps you need to take in your cabinetry journey is to assess your space and decide what your needs are. What do you require of this space for it to be completely tailored to your needs as a home chef? For me it more counter space. I want to remove the few poorly placed upper cabinets I currently have and add a few lower cabinets to the new kitchen design. The upper cabinets really make my small kitchen appear even more closed in where they currently are and there is an entire wall of wasted space where new lower cabinets and a great counter will go solving so many problems. This new setup provides me with ample working space on both sides of my stove and a kitchen that appears larger than it is. Because I am keeping some of the existing lower cabinets and adding more, the odds of them matching perfectly is slim to none. But that isn’t an issue… stay with me. Once you have assed your cabinetry needs, it’s time to weigh your options.
What Option is Right for You?
There are stores that specifically cater to discounted building and remodeling supplies. They sell overstock, discontinued or bruised items consisting of windows, doors, flooring etc. and they offer them to the public at discounted prices. It is never a given what you can find there. The stock is always shifting so be prepared to look through a few different ones. The big box stores offer prefabbed cabinets that are quite basic but very affordable and then there are the thrift stores. If you’ve never thought to look to the thrift stores for furniture to repurpose in your home, than boy, are you missing out. Scavenge those thrift stores, flea markets, antique centers and yard sales for materials like old dressers, bookshelves, wardrobes or cabinets that can be repurposed into custom cabinetry. The advantage of repurposing a thrifted item into custom cabinetry is the details the item already contains. Look at the design space you are trying to rethink and take measurements. Keep them in a little note pad that you keep with you always and when you’re out and about and make an unplanned stop at one of those forementioned locations, you’ll have with you all the information you’ll need to see if a specific piece that catches your eye will work. I also carry a small tape measurer in my pocketbook.
Make the Budget Work
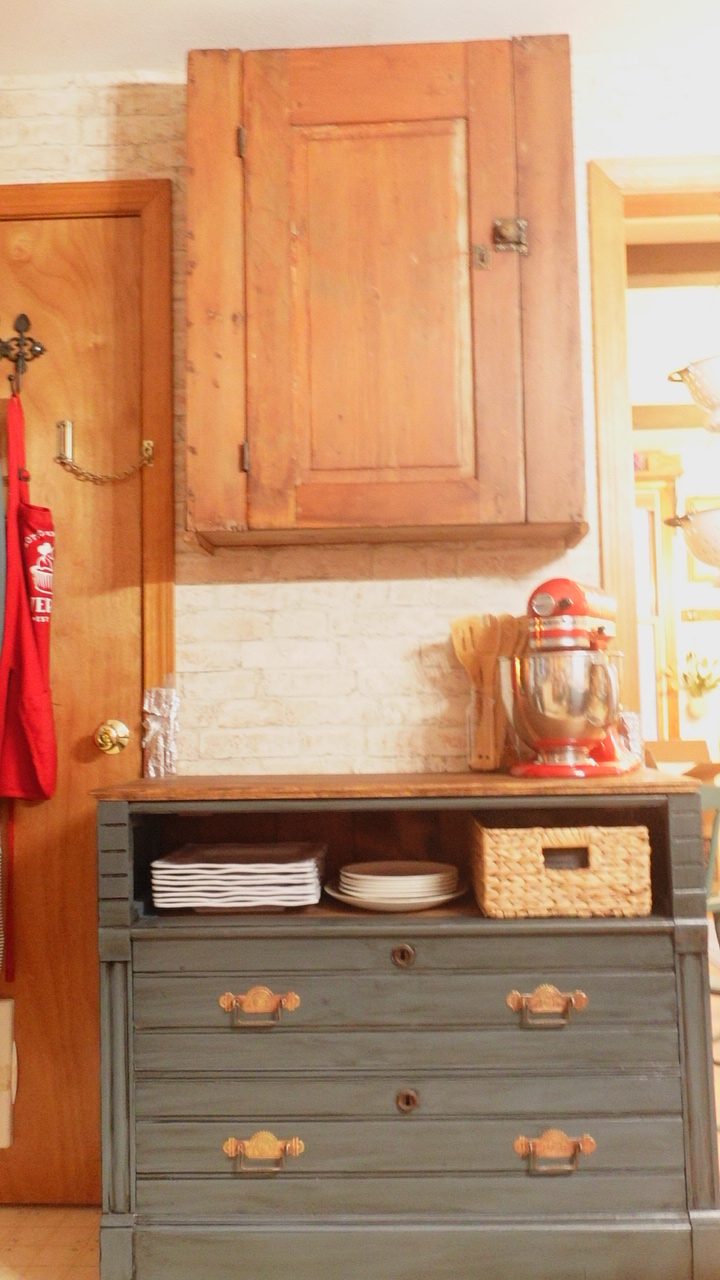
I needed a corner unit, preferably one with a lazy Susan and a double door, 36″ wide cabinet for my pots and pans. I also needed a narrow cabinet that I could store baking sheets and pizza stones in, and I was able to find those three much needed items on sale for around $300.00 total from the big box store. For those particular pieces it was the better bargain to buy them ready-to-go and new. I still needed a freestanding storage unit on the other side of the room. For that I wanted something that looked entirely custom. I wanted a one-of-a-kind statement piece to go there. I found what I was looking for already in my possession and in my basement waiting for a new life and purpose. I had thrifted an antique early 1900’s dresser for $20.00. It had all the original hardware, and I knew I would use it someday, someway. When I find furniture that is a bargain, has great bones and speaks to me, I will always purchase it and hold onto it. And such was the case with this one. I also had a piece that I scored earlier this summer, a late 1800’s jelly cabinet for get this… $20.00 at a yard sale over the summer. I knew I wanted it for my kitchen but didn’t know where. Now I believe it was meant to be that I found those two and set them aside because together they are going to become that custom cabinetry I needed and wanted in my kitchen.

It doesn’t matter that all the pieces that I am using as the cabinets don’t match. I can trick the eye into overlooking that little detail and to instead see a cohesive, custom set of cabinets entirely meant to be together by using the same paint treatment on them all. Start by prepping your cabinets. That consists of cleaning, sanding, repairing, airing out… whatever you determine the piece to need to be ready for paint. Always take your time to prep the surfaces correctly. Different surfaces require different preparation tasks. If you are unsure of what type of prep your item needs, a quick Google search will bring up the answers you are seeking. Once the piece is exactly as you want it, apply a good coat of cabinet primer and follow it with the color of your choice. An important thing to keep in mind when choosing a color for cabinets, is to keep that color as a background neutral and add pops of color through choochkies and baubles, dishes and cookware. I chose a shade of blue that has a strong undertone of gray, very is much like a piece of slate stone. Although the color is blue, it’s still very much a neutral shade that is both chic and timeless. You want a color that will withstand the test of time. You don’t want to do all this work only to need something different down the road. Choose a color that goes nicely with a variety of other colors so you can easily change out the decor, curtains and linens and get an entirely different look.
When it’s all said and done, I have this gorgeous custom cabinet that came out better than I expected. And I paid less than $100.00 to make this and it looks like an expensive, custom cabinet. I distressed the piece with a glazing technique over the blue-tiful paint. This elevated the piece even further and added to the high-end visual impact. If I was to try and purchase this piece that I created from thrifted finds, I guarantee it would cost at least a thousand dollars. The fact that I made it for less than $100.00 shows you nothing is impossible with a little creativity and thinking outside the box. What kind of custom cabinetry will you add to your kitchen remodel?

Leave a Reply